

Corey Bailey
Audio Engineering
USEFUL INFORMATION
LUBRICATING POLYESTER AUDIO TAPE
DO IT YOURSELF?
ANALOG TAPE
BAKING AUDIO TAPE
LUBRICATING AUDIO TAPE
MOISTURIZING ACETATE TAPE
RECORDS (DISCS)
RECORD CLEANING
REPAIRING A BROKEN 78
FLATTENING A RECORD
ARTICLES
A Little About Sound
Bit Depth
Conductive Paint
Mold
Optimizing your PC
Packing Records for Shipment
People I have Known
Playing Records Wet
Playing a Wire Recording
Sample Frequency
Saving Your Family Video
The Alley
The Internet
The Ken Slater Tapes
Time Charts
Transfer Stories
Tubes vs Transistors
What Type of Wire?
Your Digital Data is at Risk
Disclaimer
Neither I or my company has profited in any way from the people or
organizations mentioned in this article or elsewhere on this site.
The opinions expressed herein are mine alone and do not reflect upon the
people or organizations mentioned in this article.
Preface
First of all, I want to be very clear; In this article, I am talking about polyester
base audio tape only. This would exclude all acetate base audio tape. Acetate
base audio tape, most likely, will not benefit from the processes described in this
article. In fact, you can possibly harm or do permanent damage to acetate base
audio tape by lubricating it using the material and the procedures described
herein. Acetate base magnetic film is another animal entirely. The acetate base
used in magnetic film is much thicker (about 5 mils in the US, compared to
acetate base audio tape which is about 1.5 mils thick) and the oxide layer
applied to magnetic film is much thicker as well.
Some background
I began researching lubricants when I was the Director of Sound at MGM
Studios. This was about 1993 and our Sound Transfer room was coming across
some Reel-To-Reel audio tapes and magnetic film that needed help to play
properly. Some wouldn’t play at all. Most of the acetate base magnetic film
suffered from a condition known as ‘Vinegar Syndrome’ but a small percentage
had other problems that affected it’s playability. The magnetic film (full coat) that
fell into this category usually appeared to have a translucent white “milky”
substance on the oxide. The audio tape, on the other hand, was suffering from
the oxide being soft and sometimes sticky. I talked to everyone that I could think
of and all of those that were suggested. From Dr. Andrew Lazare of the National
Media Labs, I learned the term Binder Hydrolysis and of the relatively short life
span of magnetic media in general. I also learned of the patent filing by AMPEX
Corp. regarding the baking of polyester audio tapes. The patent filing by AMPEX
however, it didn’t address the issues with magnetic film that we had observed.
John Bonner, the Chief Engineer of Warner Bros. Studios, located in West
Hollywood CA, was experimenting with the use of talcum powder on magnetic
film. Although talcum powder did help, it was messy and would clog the play
head every few hundred feet which, would require numerous stops and starts to
get through a reel of magnetic film plus, the amount of editing it took for a reel.
I decided to experiment with lubricating the oxide of the media that was suffering
from playability issues. I used to say that I had tried everything from Alcohol to
Xycote (pronounced ‘Zee-cote’). I did find a few chemicals that worked. Alcohol
being one of them and Marie O’Connell seems to have perfected the system
using alcohol for audio tape playback. Alcohol will damage acetate base media
so, it was out. That said, I used denatured alcohol to treat mold on polyester
base audio tapes and I observed no ill effects. Some others that appeared to
have positive effects were; Decamethylcyclopentasiloxane (D5), Filmguard,
Jojoba oil, several silicone based lubricants, Last tape preservative (Tape Last)
and Xycote which, is no longer made. My favorites were D5, Filmguard and
Tape Last. Walter Davies, the inventor of Tape Last, introduced me to that
product. Regarding the chemicals tried, I have no idea of their reactions with the
chemistry of magnetic media or the long term affects which, was a
consideration. Walter Davies assured me that Tape Last had no adverse effects
on any kind of audio tape. In fact, he noted that Tape Last would enhance the
shelf life of audio tape when treated. Filmguard was developed for motion
picture film and works well on magnetic media. However, Filmguard leaves an
oily residue. Last tape preservative is the only one that is made specifically for
audio tape, evaporates quickly (like alcohol and D5) and the only one to address
storage of the media after its use. The only storage history that I have on Last
tape preservative is from some of my own tapes that I treated in 1998 and they
show no adverse signs from having been treated. Those tapes have been
stored in a closet on an upper shelf at room temperature. Recently, I revisited
those tapes and made higher resolution transfers. I was pleasantly surprised to
find that the tapes that suffered from Sticky Shed Syndrome and were treated
with Tape Last, had fared very well. I simply re-treated them and they played
without having to be baked. The only downside to Last tape preservative,
that I know of, is that it is expensive. Particularly in the manner that I use it.
Assessing a polyester base reel of tape for Binder Hydrolysis
The first thing you will need to do is determine if the tape is suffering from
Binder Hydrolysis (Sticky Shed Syndrome). This subject is also covered in my
article: “BAKING AUDIO TAPE”
The first thing I do with 7" reels (and smaller) is to insert a pencil into spindle
hole and un-spool a few layers by hand. The tape should un-spool freely. This
will tell you if the layers have the tendency to stick together. If you are dealing
with a 10-1/2" (NAB Hub) reel, you will, most likely, have to mount the reel on
the tape deck. Hopefully, the reel brakes on the tape deck will be disengaged,
allowing for easy un-spooling of the tape. I have a couple of TEAC (Brand) NAB
hub adapters (TEAC Part # TZ-612) that have a metal flange at the base which,
allows them to mount to an NAB hub off the tape deck. Then, I can use a pencil
threaded through the spindle hole to un-spool a few layers of tape the same as
smaller reels.
If you are concerned about the tape being on the floor, use a clean empty
bucket or wastebasket to catch the tape as you un-spool it. If you do have to
mount the reel on your tape deck, you can use the other reel to take up the
slack. When I check audio tape reels on a tape deck, I will thread the tape
directly from one reel to the other, avoiding the rest of the transport entirely.
Know that sometimes layer-to-layer adhesion won’t rear it’s ugly head until you
are at the last few wraps near the end of the supply reel. This problem most
often occurs on reels with smaller center hubs (5” Reels, 7” Reels, etc.).
This is why you need to pay attention to how the tape comes off of the supply
reel until the very end.
If, you suspect that layer-to-layer adhesion is present, STOP and consult a
professional. Solving layer-to-layer adhesion can be tricky and remediation is
best done by someone who knows how to deal with the problem. Often, baking
(done properly) is the answer. If any of the oxide has come off and stuck to the
back of the adjacent layer, it's ‘game over’ for that section of audio tape.
Once you have convinced yourself that layer-to-layer adhesion is not a problem
for the first few wraps, back-wind the tape onto the reel, mount the reel on your
tape deck, and attach about 4 feet of leader to the head end of the tape.
The type of leader (Paper or Plastic) is a matter of individual preference.
Leader has several benefits; It allows for thread-up and run-up to speed on a
transport before the beginning of the tape to be transferred passes across the
play head. Consumer decks tend to have shorter tape paths and some were
quite good at recording modulation to the very end of the tape. Leader also
keeps the end of the tape protected at the outer edge of the reel and protects
the tape from the unevenness of slotted hubs at the center of the reel.
Eventually, leader will be applied to both ends of the tape.
Once leader is attached to the outer edge of the tape, with the tape threaded up,
play into the tape for about 30 seconds. Stop the tape deck and disable the
transport (as though you are going to edit the tape). With the tape deck in STOP
mode and the tape threaded up, rotate the reels back and forth by hand. There
should be no resistance except for the reel brakes. No tendency for the tape to
stick to any of the stationary parts of the tape path. Now, pull the tape away from
the transport and observe all of the stationary parts of the transport (heads,
guides, idler arms, etc.). There should be NO evidence of any oxide build-up on
any of the stationary components. With the tape pulled away from the transport,
clean everything that comes in contact with the tape. Use the purest alcohol you
can find. Medical grade alcohol is best, if you can get it. Isopropyl alcohol can
be found that is 99% pure. Rubbing alcohol that you get at the drug store
usually contains a certain percentage of water and any kind of water is generally
not good for the tape or the tape deck.
Inspect the Q-Tips or cloth that you used for any oxide residue. Presuming that
you have a very clean tape path, play the tape for about 30 seconds again.
While the tape plays, observe how it comes off the supply reel. There should be
no tendency for the tape to stick to an adjacent layer. Listen to the tape while it
is playing past the heads (put your ear up close to the head stack). There
should be no squealing or any suspicious sounds of any kind. Stop after 30
seconds or so, rotate the reels back and forth by hand (again) to check for any
signs of sticktion. Pull the tape away from the transport and inspect all of the
stationary surfaces (heads, guides, idler arms, etc.) for any sign of oxide
deposit. Clean the entire tape path again and yes, inspect the Q-Tips or cloth
that you used for any oxide. Some discoloration of the Q-Tip is normal.
Particularly after cleaning the pinch roller(s). By now, you have played about a
minute or more of the tape and should not have observed anything out of the
ordinary. It is at this point that I will back-wind the tape to the beginning and
lubricate the entire length of the tape. When I have finished with the lubricating
process, I will attach a leader to the end of the tape and I am ready to begin the
transfer after a rigorous cleaning and inspection of the entire tape path. I
will often transfer side B first to avoid the unnecessary rewinding of the tape
even though, on my particular tape deck, the tape only comes in contact with
ball bearing surfaces for any operation other than playing the tape. If you are not
using a lubricant, you can simply spool the tape from one reel to the other
(carefully) and attach a tail leader.
The tape deck that I use for this process (An Otari MTR-15) has been modified
so that the tape itself only comes in contact with rotating bearing surfaces in any
mode other than play. Even the tape lifters have been sleeved so that the
sleeves act as rotating bearings. I will only use the Fast-Forward/Rewind
functions to position the tape prior to transfer. Fast-Forward and Rewind
functions are accomplished using the ‘shuttle’ mode with the tape threaded
around a reversing idler, away from any stationary parts of the transport. Some
tape decks, such as the Studer 80 series, are designed with only rotating
bearing surfaces that come in contact with the tape for all operating modes
other than play.
Lubricating analog audio tape
Once you have determined that the tape is not suffering from any kind of binder
hydrolysis, you can move on to the lubrication process. Using rubber gloves or
food prep plastic gloves (They’re much cheaper), Fold a 4”X4” piece of
Texwipe® and wet both sides thoroughly with lubricant. I use Texwipes because
they don’t shed (known as lint free). You can also use Pellon® (available at a
yardage store) or any cloth that won’t shed lint onto the oxide or backing.
I use the ‘shuttle mode’ on my tape deck for this process. If your tape deck does
not have a shuttle mode, you can simply bypass the head stack and shuttle the
tape directly from one reel to the other, lubricating the tape in the process. (Fig.
2) You will need to tape one of the idler arms so that the tape deck transport is
in the ON position (Also Fig. 2). Using the play mode to turn the reels will
probably be the safest. Your fingers, holding the cloth, will determine the hold-
back tension during the lubrication process. This is a learned operation so I
would suggest some practice if you are going to use this method. Using a non-
shed fabric will not harm the tape while you become practiced. I would
recommend practicing on a section of blank tape if possible. You can also use
an 8MM film editing machine, if you have one.
Using an 8MM editing machine, you would simply thread the tape directly
between reels, avoiding the editing assembly entirely. Same goes for the
practice advice since one hand will be cranking the reels.
Fig. 2
For all mechanisms
While shuttling the tape, periodically apply more lubricant to the cloth (tape
oxide side) using an eye dropper or a syringe designed to apply liquids
(Not a medical syringe with a sharp needle!). As to how often to apply more
lubricant, it’s all a learning process and it depends on the speed of the tape
passing through the cloth or by the applicator. I would apply a drop of lubricant
every couple of seconds with the tape traveling at shuttle speed (about 3-5
times play speed). Obviously, the faster the tape speed, the more often lubricant
will need to be applied. Since lubricating the tape using this process takes two
hands, one will need to stop and apply more lubricant because one hand has to
act as a reel break or using a hand-crank mechanism such as a film editor.
Overlapping sections of the tape with lubricant is not a problem. Once you have
lubricated the tape end-to-end, Attach a section of leader to the opposite end of
the tape. At this point, you are done and can play the tape. Presuming that you
started with side 1, you can simply flip the tape onto the supply reel and start the
transfer. Know that you will be starting with side 2,
if it’s a quarter track or a two track mono. Otherwise, it will play backwards.
This saves rewinding the tape.
Caveat; Although I have used the previously described process many, many
times, the process I now use for lubricating audio tapes involves a custom built,
stationary felt pad. (Fig. 3) I evolved to the stationary felt pad method because it
was somewhat faster (I have transfered a lot of tapes) and it is more of a hands-
free operation. If the tape is in poor condition and/or the backside needs to be
cleaned, I will use the method described above.
Fig. 3
There is a considerable amount of useful information at the Last Factory
website.
Return to TOP of page
© Corey Bailey Audio Engineering
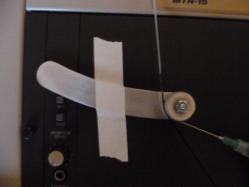


Fig. 1
Place the cloth so that it
covers both sides of the
tape.